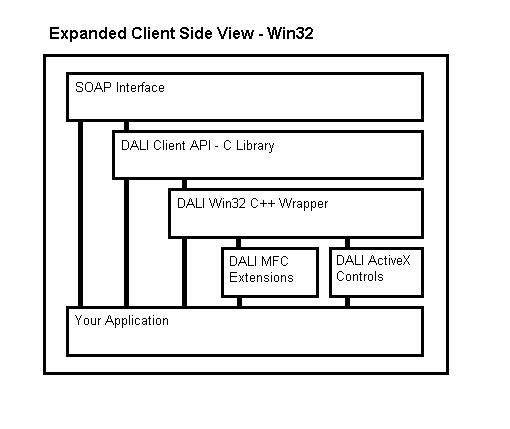
The DALI Win32 software package provides libraries and sample code that allow a developer to quickly and easily create programs that communicate with a DALI server.
At the lowest level, DALI communication is done via the open, widely used SOAP protocol. Writing software to use this protocol is not a trivial task, which is why we provide three libraries that provide increasing layers of abstraction.
The first library we provide is dalic.lib, a C-language development library. This library handles all the networking code, and wraps all supported SOAP calls into an easy-to-use C-style API.
The second library we provide is dali_w32.lib. This is a C++ library built from dalic.lib. It abstracts much of the programmatic complexity of dalic.lib in a class named CDali. This class supports both MFC and non-MFC applications.
The third library is a collection of custom MFC and ActiveX controls. When these controls are registered with a CDali class, they automatically handle everything necessary to continuously monitor and interact with a DALI server.
There is no installer needed to use the DALI development libraries; you simply include them in your project as you would any library. To make this task easier, you may copy the header (.h) files and library (.lib) files into your compiler's default directories.
For Visual Studio 6.0, this would be:
Header files: C:\Program Files\Microsoft Visual Studio\VC98\Include
Library files: C:\Program Files\Microsoft Visual Studio\VC98\Lib
Alternatively, you may run the copylibs.bat script to automate this process.
Install the ActiveX controls by running the installax.bat script.
This tutorial assumes that you have copied dalic.h/dali_w32.h into your include directory, and dalic.lib/dali_w32.lib into your lib directory. It also assumes that you have a DALI server running that you can connect to.
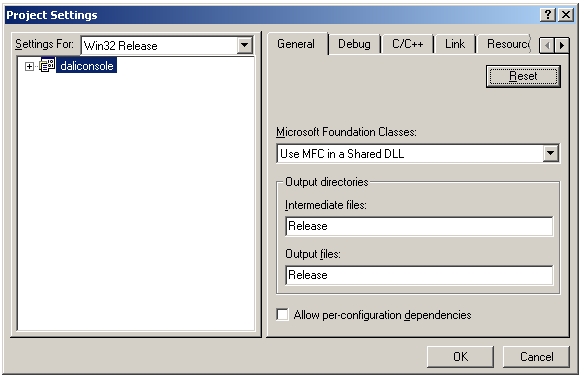
To begin, let's make a simple console application. Open Visual C++ 6.0. Select "File->New..." from the menu. Choose "Win32 Console Application" and name the project "daliconsole". Press the "OK" button.

At the project setup screen, create an empty project and select "Finish", then "OK".
Press Alt-F7 to bring up the Project Settings dialog. Under the General tab, make sure that "Use MFC in a Shared DLL" is selected.
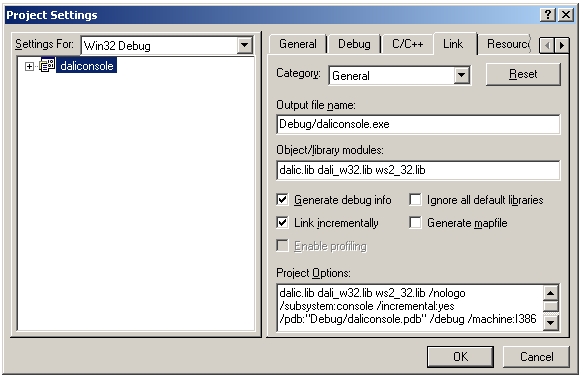
Under the Link tab, make sure the linker includes "dalic.lib dali_w32.lib ws2_32.lib".
Now, go to "File->New..." and create a new C++ source file named daliconsole.cpp. Here is the code to place in the file:
#include#include "dali_w32.h" int main(int argc, char ** argv) { CDali dali; int rc = dali.SetServer("192.168.1.221", 8444, 0); if (rc) { printf("rc = %d\n", rc); return rc; } DALIADSETTINGS adsettings; adsettings.gain = 1; adsettings.polarity = 0; adsettings.range = 1; dali.PerformDAConvert(0, 0, 4095); int sample; dali.PerformADSample(0, 0, &adsettings, &sample); printf("Sample: %d\n", sample); getchar(); return 0; }
Replace the server IP and port with those matching your own running DALI server. For simplicity, this tutorial assumes that the DALI server has one board (board 0) that is capable of D/A and A/D operations. This kind of assumption is not good practice, and normal DALI applications should first interrogate the server for a list of boards and their capabilities. Examples for that kind of operation can be found in the sample code section.
For now, you can build this code (F7). Ignore warnings about the default libraries. They won't affect the code. These warnings appear because you are using the MFC DLL in a console application, and can be removed by following the warning instructions (adding appropriate /nodefaultlib statements to the linker options.)
Press F5 to run your application in debug mode. The board attached to the DALI server will perform a D/A conversion with 4095 and return a single A/D sample.
All functions listed below are members of the CDali class.
Unless otherwise stated, the return values are error codes. A return value of 0 denotes success; non-zero means failure (compare value to defined error codes, or use GetLastErrorString).
When creating an MFC application, you will most likely have several controls all constantly querying and displaying different values from the DALI server. Under normal circumstances, this would be a complicated task of managing threads or handling timer events.
The CDali class presents an "interface" paradigm, allowing controls to plug into the CDali class with a single function call. The CDali class will handle all threading and messaging behind the scenes. Our library of custom MFC and ActiveX controls know how to interact with the CDali object to constantly update and send messages back and forth.
You can also easily write your own CWnd-derived controls that communicate with the CDali class through an interface, as well as hook standard functions to be triggered on events.
Anytime you register an interface, you pass in a pointer to a DALI_INTERFACE_SETTINGS struct. These are the input members:
DALI_CMD_AD_SAMPLE
DALI_CMD_AD_SCAN
DALI_CMD_DA_CONVERT
DALI_CMD_DA_READBACK
DALI_CMD_DIO_IN_BYTE
DALI_CMD_DIO_IN_BIT
DALI_CMD_DIO_READBACK_BYTE
DALI_CMD_DIO_READBACK_BIT
DALI_CMD_DIO_OUT_BYTE
DALI_CMD_DIO_OUT_BIT
DALI_CMD_AD_SCAN_SPREAD
DALI_CMD_DIO_IN_BYTE_SPREAD
DALI_CMD_DIO_READBACK_BYTE_SPREAD
(The spread commands will be discussed later.)
Certain data acquision operations return multiple values (e.g. A/D Scan.) Unfortunately, most controls can only represent one value. For this reason, it is nice to split a multi-valued operation among many controls (e.g. split a 16-channel A/D scan among 16 progress bars.)
For this purpose the DALI_REGISTER_SPREAD macro is used:
These are all pretty straightforward; they're just wrappers for the associated dalic functions applied to the specified 'board'.
See the DALI C/C++ Client documentation in this manual for more information on these parameters.
This tutorial will walk you through all the steps necessary to create a fully automated MFC application that will interact with a DALI server. If you'd like to open the finished project, you can find it in the samples directory distributed with the DALI server as DALIMFCTest.zip".
The first thing to do is create a new MFC application. Open Visual C++ 6.0, select File->New..., highlight "MFC AppWizard (exe)", enter the desired path in "Location:" and enter "DALIMFCTest" in the "Project Name:" field.

Press the "OK" button. On the next screen, make sure "Dialog Based" is marked, then click on the "Finish" button. Visual Studio will now generate all initial project and source files for you.
Now go to the project settings by pressing Alt+F7. Go to the Link tab and
enter dalic.lib dali_w32.lib dalictrl.lib ws2_32.lib into the
Object/Library modules box:
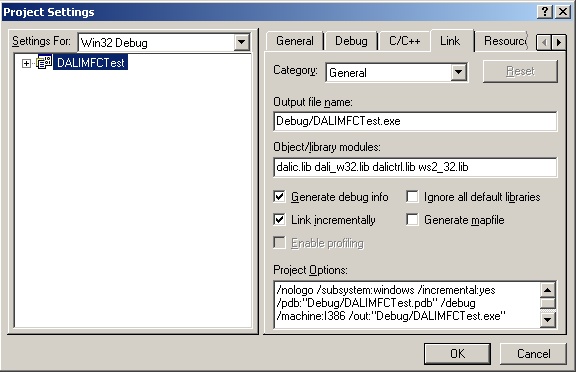
This will import all of the DALI libraries, as well as the Winsock library, into your project.
Go to the main dialog resource and remove the TODO label in the middle of the dialog (click on it with the mouse and press the delete key.)
Select the progress control button from the controls box and paint a progress bar onto the dialog. Right click on the bar and select "Properties". Go the Styles tab and enable Vertical and Smooth:
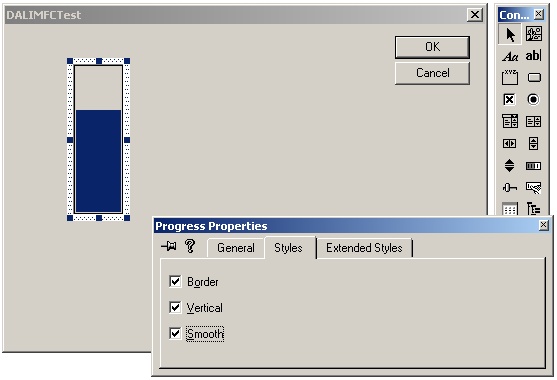
Now resize the progress bar to a more suitable vertical shape. While it is highlighted, press Ctrl+C to copy the control to the clipboard, and use Ctrl+V to lay down 3 more identical copies - to make four progress bars in a row.
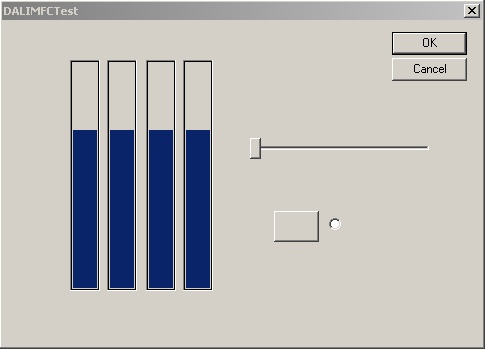
Lay down a slider control, a button control, and a radio control. Change the labels on the button and the radio control to be blank. Your dialog box should now look something like this:
Now we're going to insert the code which will connect these controls to the
DALI server. The first thing we have to do is include the
dalictrl.h file in our dialog's header file
(DALIMFCTestDlg.h) at line 10. The result should look something
like this:
#if _MSC_VER > 1000
#pragma once
#endif // _MSC_VER > 1000
#include "dalictrl.h"
Now go to the DALIMFCTestDlg class declaration in
DALIMFCTestDlg.h, line 19. Add the following lines:
class CDALIMFCTestDlg : public CDialog
{
// Construction
public:
    CDALIMFCTestDlg(CWnd* pParent = NULL);	// standard constructor

    CDali dali;

    CDALIProgressCtrl m_progress[4];
    CDALISliderCtrl m_slider;
    CDALIButtonCtrl m_button;
    CDALICheckBoxCtrl m_radio;

    void HandleError(int rc, char* str);

// Dialog Data
        //{{AFX_DATA(CDALIMFCTestDlg)
The CDALIxxx classes are defined in the DALI control library and contain the
logic necessary to be used as an interface. The CDali object will be the main
interface to the DALI server. The HandleError function will
provide us with simple error codehandling.
Now open the dialog source file DALIMFCTestDlg.cpp. Go to the
DoDataExchange member function and add these lines:
    CDialog::DoDataExchange(pDX);
    //{{AFX_DATA_MAP(CDALIMFCTestDlg)
        // NOTE: the ClassWizard will add DDX and DDV calls here
    //}}AFX_DATA_MAP

    DDX_Array(IDC_PROGRESS1, m_progress, 4);
    DDX_Control(pDX, IDC_SLIDER1, m_slider);
    DDX_Control(pDX, IDC_BUTTON1, m_button);
    DDX_Control(pDX, IDC_RADIO1, m_radio);
These lines will attach the previously defined classes to the controls we
drew in the resource editor. The DDX_Array macro is provided by
the dali_w32.h header file to allow quick mapping of an entire
control array.
We will also want to include our HandleError function to catch
error codes. You can place this function at the end of the
DALIMFCTestDlg.cpp file:
void CDALIMFCTestDlg::HandleError(int rc, char* str)
{
    if (rc)
    {
        char buffer[1024];
        sprintf(buffer, "%s Error [%d]: %s\n", str, rc, dali.GetLastErrorString());
        MessageBox(buffer, "DALI Error");
        exit(rc);
    }
}
Now we add the heart of the DALI code into the OnInitDialog
member function. This code initializes the controls and starts the interfaces
between the CDali object and the control objects. When the initialization
concludes, you will be able to monitor 4 A/D channels, change one D/A channel
and toggle/view a DIO channel. This code will be inserted at line 124 of
DALIMFCTestDlg.cpp:
// TODO: Add extra initialization here

for (int i = 0; i < 4; i++) m_progress[i].SetRange32(-32767, 32767);
m_slider.SetRange(0, 4095);

UINT bhandle, ihandle;

HandleError(dali.SetServer("127.0.0.1", 8444, 0), "dali.SetServer()");
HandleError(dali.GetBoardHandle("demo", &bhandle), "dali.GetBoardHandle()");

DALI_INTERFACE_SETTINGS dis;

DIS_OPER(dis, bhandle, DALI_CMD_AD_SCAN_SPREAD, 100);
DIS_CHAN(dis, 0, 3);
DIS_ADSET(dis, 10, DALI_BIPOLAR, 1);

//Register A/D
DALI_REGISTER_SPREAD(dali, dis, m_progress, 4, ihandle);

//Register D/A
DIS_OPER(dis, bhandle, DALI_CMD_DA_CONVERT, 100);
HandleError(dali.RegisterInterface(&dis, &m_slider, &ihandle), "dali.RegisterInterface(DA)");

//Register DIO out
DIS_OPER(dis, bhandle, DALI_CMD_DIO_OUT_BIT, 100);
DIS_CHAN(dis, 0, 0);
HandleError(dali.RegisterInterface(&dis, &m_button, &ihandle), "dali.RegisterInterface(DIO Out)");

//Register DIO in
DIS_OPER(dis, bhandle, DALI_CMD_DIO_IN_BIT, 100);
HandleError(dali.RegisterInterface(&dis, &m_radio, &ihandle), "dali.RegisterInterface(DIO Out)");

return TRUE;  // return TRUE  unless you set the focus to a control
That's all there is - in total about 30-40 extra lines of code. You will
want to change the IP of the destination server if you are not running a DALI
Server on your local machine. You can always connect to
dali.diamondsystems.com as a default.
Now build the project with F7. The DALI libraries were built with the release version of MFC, so you may receive a warning when building a debug-version MFC application. It is ok to ignore this warning. Press F5 to run!
For this example you should create a new MFC application (using the MFC AppWizard) and create a default dialog application.
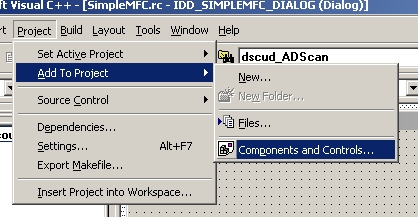
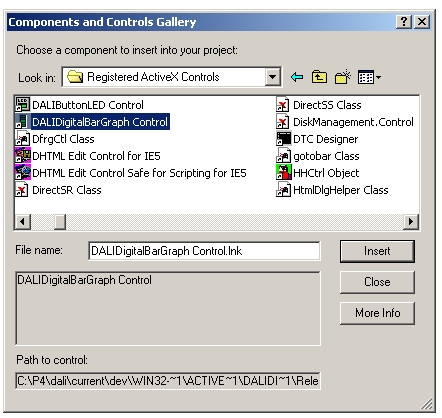
Select from the menu, "Project->Add To Project->Components and Controls..."
You will get this window:
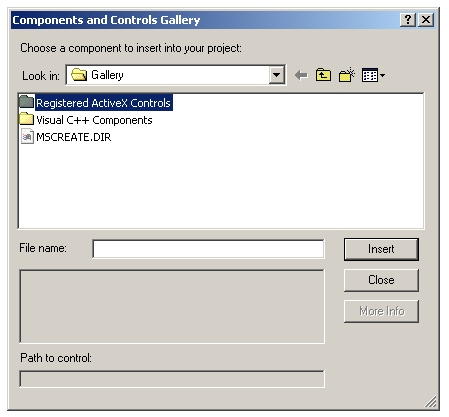
Open "Registered ActiveX Controls" and locate the ActiveX control you wish to include. Here I will include DALIDigitalBarGraph:
Now click on "Insert" and choose "OK", you will get this window:
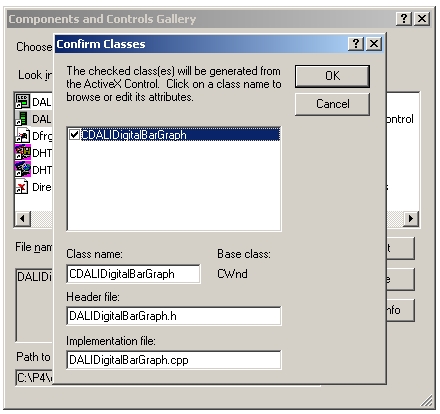
Click on "OK" and it will insert the new .h and .cpp file into your project (in this case, dalidigitalbargraph):
You will now notice that in your dialog box resource editor there is a new component. Painting this new component on the dialog box will create DALIDigitalBarGraph objects.
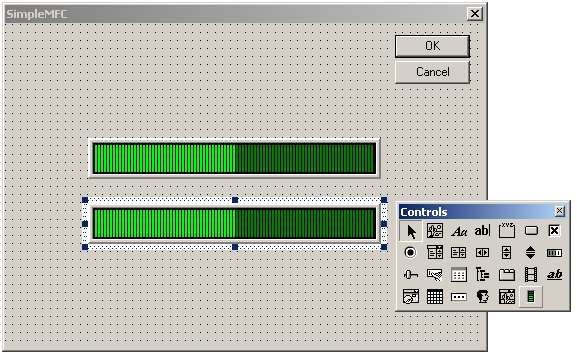
The DALIDigitalBarGraph component will now interact with the resource editor and classwizard like any standard MFC common control.